Integrate AEM with LDAP
Introduction-
You can configure Adobe Experience Manager (AEM) 6 to synchronize user account information from a third-party LDAP service. By configuring AEM to use a third-party LDAP service, you can authenticate LDAP users when logging into AEM. This article describes how to setup Apache Directory service (a popular open source LDAP service), create a new user, configure AEM 6 to use Apache Directory service, and finally login to AEM with the new user entered into Apache Directory service.
Note: Article tested in AEM 6.2


Prerequisites-
You'll need to install AEM 6 or 6.1 to complete this
walkthrough. If you do not have a AEM installation up and running If you don’t have then please contact SPPHELP@adobe.com.
Overview-
You'll perform the following broad steps during the course of
this walkthrough:
- Install ApacheDS
- Create a new entry and user in ApacheDS
- Configure AEM with ApacheDS
- Validate CQ-ApacheDS integration
Install Apache Directory-
Download the latest ApacheDS from http://directory.apache.org.Run the installer for your operating system, follow the
installation instructions on the download page, and proceed with the default
installation settings. Download Apache Directory Studio from the same URL and install
it.
Configuring Apache DS/LDAP server-
- From the servers tab, click on new.
- Create a server ApacheDS 2.0.0 which you can see in pop-up window.
- Once you will create you will be able to see the server on server tab.
- Right click on the server and click on Run.
- It will ask you for port confirmation click on OK.

Creating Connection in LDAP-
1. Click
on file, the new and the click on LDAP Connection.
2. Click
on next and mention the below parameters.
Connection
name: ldap
Hostname:
localhost
Port:
10389
Encryption
Method: No encryption
Provider:
Apache Directory LDAP Client API
4. Click on Check Network
Parameter. You should be able to see successful message.
3. Click
on next,
Authentication
method: Simple Authentication
Bind
DN or user: uid=admin,ou=system
Password: secret
Password: secret
Note: this is default admin password for LDAP.
Once you specify the parameters, click on Check Authentication.
You should be able to see successful message. Click on finish. You will see
below screen once you will click on finish.

Create a new entry in LDAP-
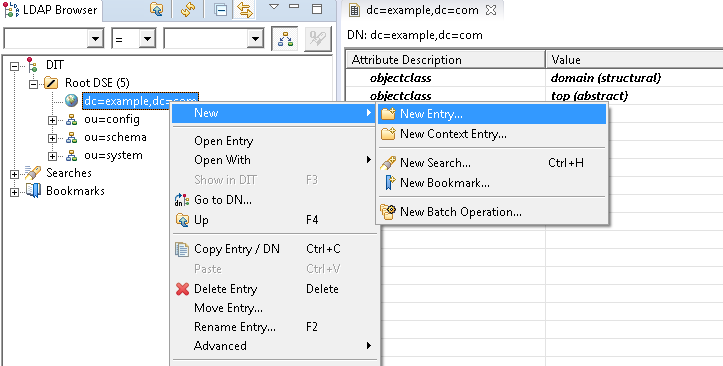
- Click on dc=example,dc=com under DIT/Root DSE.
- Right-click on the node dc=example,dc=com and select New Entry. The New Entry wizard appears.
- In the Entry Creation Method pane, select the Create entry from scratch radiobutton Click Next.

4. Find
the organizationalUnit object. Select it then click Add.

5. Click Next. On the RDN field enter ou. On the value field enter ‘Groups’. The DN Preview should like below (Distinguished Name (dn), The Parent field should same like
below).
6. Do the same for Users.
7. Create new entry following same method and users for
ou attribute.
8. We'll place their personal information under the ou=users
9. Let's start with the ou=users. We'll be adding new user called ‘prince’.
Person using the inetOrgPerson object.
10. The inetOrgPerson[1] object class is a general
purpose object class that holds attributes about people.
Creating new user-

Select Create entry from scratch. Click Next. Find inetOrgPerson object. Select it then click Add. Now on the RDN field.
Cn: prince

Click on next and Under the sn attribute, enter ‘shivhare’ (sn stands for Surname).

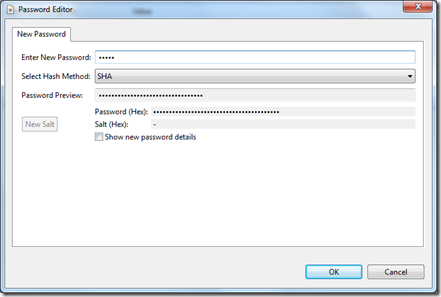
We need to add a password for
this user. Right-click on the same window. Select New Attribute. The Attribute
Type window will appear.
11. On the Attribute type field, enter userPassword: 54321
12. You will be asked to enter a
password. Enter pass as the new password. Make sure that the Select Hash Method is set to SHA
Now Add the Groups
(Authorization Levels):
13. Same like above steps we
select ‘New Entry’ and ‘Create entry from scratch’
14. In ‘Object Classes’ window we will pick
‘groupOfNames’, Select it then click Add.
RDN field enter cn. On the value field
enter ‘admin’.

18. As we pcik ‘groupOfNames’ we
will have member field and for that value we make double click
19. Then DN edit will come and
then browser for the user that we need. Once you will click on finish. It means you have created
a user successfully in LDAP.
Configure in AEM-
Configure AEM with ApacheDS-
To configure AEM 6 to use LDAP, configure these OSGi configuration settings:
Apache Jackrabbit Oak LDAP Identity Provider - defines how users are retrieved from the LDAP server
Apache Jackrabbit Default Sync Handler - defines how the Indetity Provider users and groups will be synchronized
Apache Jackrabbit External Login Module - defines which Identity Provider and Sync Handler to use
Apache Jackrabbit Oak LDAP Identity Provider-
Open the Felix Web Console (http://localhost:4502/system/console/configMgr) and search for the Apache Jackrabbit Oak LDAP Identity Provider config and click on the plus ‘+’ button. Add the following values (based on the LDAP settings created in this article).
LDAP Provider Name - name of the provider. You can specify ldap.
LDAP Server Hostname - the name of the provider. Localhost is used in this example.
LDAP Server Port - the port of the LDAP server. 10389 is used in this article.
Bind DN - DN used for user authentication. uid=admin,ou=system is used.
Bind Pwd - the corresponding DN password. The value secret is used.
User base DN - the base DN for user searches. In this example, dc=example,dc=example is specified. (the values entered specified using Apache Directory Studio).
User Id attribute - name of the user attribute. Specify uid (this was specified in Apache Directory Studio).
When done entering these values, ensure that you click Save. The following illustration shows the Apache Jackrabbit Oak LDAP Identity Provider values.

Input the follow information and save-
NAME
|
VALUE
|
DESCRIPTION
|
LDAP
Provider Name
|
ldap
|
Name
of the LDAP provider Configuration.
|
LDAP
Server Hostname
|
localhost
|
Hostname
of the LDAP server.
|
LDAP
Server Port
|
10389
|
Port
of the LDAP server.
|
Use
SSL
|
FALSE
|
SSL
|
Use
TLS
|
FALSE
|
TLS
|
Disable
certificate checking
|
FALSE
|
Certification
validation.
|
Bind
DN
|
uid=admin,ou=system
|
DN
of the user authentication
|
Bind
Password
|
secret
|
Password
of the user authentication.(secret)
|
Search
Timeout
|
60s
|
Search
timeout.
|
Admin
pool max active
|
8
|
Max
Active size of the Admin connection pool.
|
User
pool max active
|
8
|
Max
Active size of the user connection pool.
|
User
base DN
|
dc=example,dc=com
|
The
base DN
|
User
object classes
|
person
|
User
object class.
|
User
id attribute
|
uid
|
User
Id
|
User
extra filter
|
Extra
LDAP filter to use when searching for users.
|
|
User
DN paths
|
FALSE
|
|
Group
base DN
|
ou=groups
|
Base
DN for groups.
|
Group
object classes
|
groupOfUniqueNames
|
Object
Classes of groups.
|
Group
name attribute
|
cn
|
Attr.
name of the group name.
|
Group
extra filter
|
||
Group
DN paths
|
FALSE
|
|
Group
member attribute
|
uniquemember
|
Group
attribute that contains the members of a group.
|
Apache Jackrabbit Oak Default Sync Handler-
In the Felix Web console, search for the Apache Jackrabbit Oak Default Sync Handler config and click on the plus ‘+’ button. Specify the Sync Handle Name and User Property Mapping as shown in the illustration and Click Save. In this example, profile/nt:primaryType="nt:unstructured" and profile/givenName=cn values are used for User Property Mapping values.

User property mapping: profile/nt:primaryType="nt:unstructured" and profile/givenName=cn
Apache Jackrabbit Oak External Login Module-
In the Felix Web console, search for the Apache Jackrabbit Oak External Login Module config and click on the plus ‘+’ button. Enter the Identity Provider Name and Sync Handler Name which created before and Click Save.The following illustration shows this configuration.

Synchronize ApacheDS users-
Although you've configured AEM for use with ApacheDS, you'll not yet be able to log in to AEM as an LDAP user. You'll need to first log in as administrator, import the LDAP users, and grant them appropriate permissions.
1. Go to jmx console (http://localhost:4502/system/console/jmx). Search for External Identity Synchronization Management and click on the row.
2. Click on syncAllExternalUsers() to sync all the users manually.
3. Click the Invoke button.

1. Go
to the Users view at http://localhost:4502/useradmin. You will see the
LDAP users.
2. Click the Permissions tab and give the user
appropriate permissions. For this walkthrough, grant all permissions to the
user.
3. Log out of
AEMdobe CQ.
4. Log into AEM as sprince (and the password
specified using ApacheDS) to validate the AEM LDAP integration. Now you are
logged in as an LDAP user.

5. Now
you should be able to successful login.

Article Written By-
Prince Shivhare
Facebook: https://www.facebook.com/cool.prince51
I don't get it. Why do you have to sync the users into AEM for the authentication to occur. Surely it would make more sense to connect to the LDAP server, verify that the user exists, and then sync the data back into AEM?
ReplyDeleteI mean when you have 10,000 users on your LDAP, this is not a solution is it.
Exactly, if the user list is big how to handle? And also how to handle inactive ldap users in AEM?
ReplyDeleteHi, I want to sync users manually not syncAllUsers. Can you advise how can I use sync Users for syncing users one by one. Thanks!
ReplyDeletedo we need import ldap cert for ssl connection
ReplyDelete